Microsoft Excel 2010 – Paste Special

One of my favorite commands in Excel is Paste Special.  Let’s say you set up a formula in cells B1:B5 based on the values in cells A1:A5.  Then you want to paste the results into cells E1:E5.

If you simply do a Copy > Paste, the values pasted in will be totally different.  This is because the formula you had set up is no longer referencing the values in cells A1:A5.  Now, it is referencing the values in cells D1:D5.

We can correct this by doing a Paste SpecialPaste Special will copy the values rather than the formulas.  The values that were calculated in cells B1:B5 are now moved over to cells E1:E5.
Continue reading
PowerPoint – Screen shot

One of the updates to PowerPoint 2010 is the Screen shot tool.  I usually use a program called Snag-It for my screen shots.  However, now I can make screen shots directly in PowerPoint.

Make sure to open the software that you want to take a screen shot of.  Then, open PowerPoint.  On the main menu, click Insert > Screen shot.  You can do one of two things:

  1. Available windows:  if you click on one of the available windows, PowerPoint will take a screen shot of that entire window and dump the picture into your PowerPoint slide.
  2. Screen Clipping:  one of the available windows will open.  The mouse will turn into a cross.  With the mouse, select the area you would like to appear in the screen shot.  The information will be dumped into the PowerPoint slide.

This screen shot tool removes a lot of steps.  Before, you had to hit the Print Screen button, paste the data into Microsoft Paint, save the image and insert the image into PowerPoint.  This four step process is reduced down to one step.  As PowerPoint evolves, more and more great tools like the Screen Shot tool are being incorporated into the software.

PowerPoint: Arranging Graphics

One of the questions I often get is, “Now that I have selected my images, how do I align them properly to my slide?”  There are two recommendations I have.

  1. Turn on the ruler – If you right-click in an empty area of the slide, on the context menu, there is an option for “Ruler.”  Make sure that box is checked.  A ruler will appear on the left and top parts of the screen.  This will allow us to properly align our images.
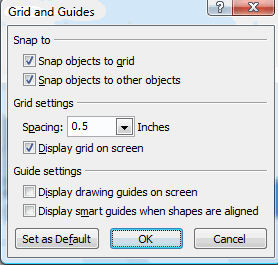
  2. Turn on the Grid and Guides – Right-click in an empty area of the slide.  A menu will pop up.  Click on “Grid and Guides.”  In the “Grid and Guides” menu, there is a check box next to Snap Objects to Grid.  Check this box off.  When this option is selected, the image you are moving will snap to the grid.  This is perfect if you want to line up your images with the ruler.  You can specify the spacing of the grid as well.  The smallest setting you can use is 1/24.”
Grid And Guides Dialog Box

Grid And Guides Dialog Box

Purchasing MS Office for Cheap

If you were to buy MS Office in Staples or Target, it would be very expensive.  However, there are a few places where you can get MS Office for far less. 

Microsoft Home Use Program – Because I work for the state, I have access to this program.  On the site, you can enter your work email and Microsoft will let you know if you are eligible for this program.  If you are, you can get MS Office Professional Plus for $9.95.  This includes Access, Excel, PowerPoint, Word, InfoPath, Sharepoint, Outlook and OneNote.  You can download the software to your computer, or you can purchase the DVD at an extra cost.  Either way, it is a tremendous bargain. 

Your college or University – If you are a current college student, you can probably get MS Office for a reasonable price through your school.  Take advantage of the tuition you are paying! 

If you are not a student, and your workforce does not participate in the Microsoft Home Use program, you can buy the “Office Home and Student 2010,” which has Excel, OneNote, Word and PowerPoint for $119.  This is enough for the average computer user.

PowerPoint – decomposing Clip Art

In Microsoft PowerPoint, you can add Clip Art to your presentation, by going to the “Insert” menu.  Some clip art is Windows Metafiles (.wmf) files.  The .wmf files are the cartoon-like images.

The nice thing about .wmf files is that you can decompose them into editable parts.  Let’s say you have an image of a woman with a briefcase, and you want to remove the briefcase from the picture.  It is very simple to do this.  Simply add the .wmf file to your slide.  Right click on the image, and go to Group > Ungroup.  PowerPoint will display the following message:  “This is an imported picture, not a group.  Do you want to convert it to a Microsoft Office Drawing Object?”  Click Yes.  Once again, right click on the image, and go to Group > Ungroup.  Simply click on the components you wish to delete and delete them.

When you are done editing the image, select all the components of the image, right-click and select Group > Group.  You have just edited a Windows Metafile!

PowerPoint: Designing Buttons for the web

PowerPoint is becoming so powerful.  A lot of the functions that before you could only do in Photoshop, now you can do in PowerPoint.  You can make buttons in PowerPoint that will look great on your webpage.
  • On the main menu, click Insert > Shapes and find the rounded rectangle.  Place that in your slide.
  • Right click on the button and select “Edit Text.”  Add text to the button.
  • Choose a gradient.  Left click on the button and select the format tab.  Under “Shape Fill,” choose “Gradient” and choose the gradient you like.
  • When the button is ready for your webpage, right click on the button and select “Save as Picture.”  Make sure to save the graphic as a png.  This way, the rounded corners will be transparent.
Button made in PowerPoint

Button made in PowerPoint

This is an easy way to make an attractive button for your web page.  You do not need to learn Photoshop or Fireworks to make an attractive button for your web page.  Nowadays, you can use PowerPoint as your graphics editor.

PowerPoint – Compress Images

PowerPoint files are typically incredibly large.  I have one PowerPoint here that is 1.3 MB.  An excellent way to shrink a PowerPoint file is by clicking “Compress Images.”  Simply, click on one of the images in your presentation.  On the “Format” tab, under the “Adjust” pane, find “Compress Pictures.”  Click on the button.  The default compresses the images to 150 ppi.  The Compress Pictures function shrunk my PowerPoint from 1.3 MB to 822 KB.

Most importantly, the person who is viewing your presentation will not know the difference.  This simple task is something you should do before e-mailing out any of your presentations.

PowerPoint: Why are my images distorted?

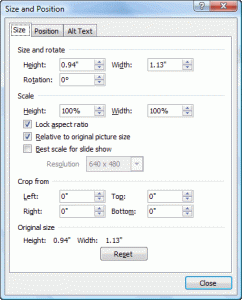
Lock Aspect Ratio
Lock Aspect Ratio

Very often, you will see websites where images appear to be stretched out.  You wonder, how did that happen?  Truly, that person is not that thin, or that heavy?  It is embarassing when it is you that is stretched out in pictures.  Well, it doesn’t have to be you any longer!

When resizing an image in your PowerPoint document, on the right hand side of the screen, you will see a “Format” tab.  Click on “Format”, and click on the dialog box launcher in the “Size” group.

In the “Size and Position” box, under “Scale” you will notice a button for “Lock Aspect Ratio.”  Keep that box checked.  It is only when you uncheck that box that you get distorted images.  Notice, as you adjust the height of the image, the width adjusts along with it.  This is what we are looking for. This ensures that the images do not become distorted.

This tip is fundamental to dealing with images.  It applies, not only to PowerPoint, but to any Microsoft Office or HTML document.

PowerPoint: Removing the background of an image

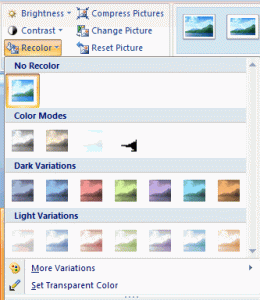
Remove the background of an image

Remove the background of an image

I found a great way to remove the background of an image in MS PowerPoint 2007.  First, add the image.  The “Format” tab will appear.  Click on the Format tab.  You will notice an option for “Recolor.”  Click the down arrow.  Select “Set Transparent Color.”  Then, click on the part of the image you wish to remove.  This action should remove the background.

NOTE:  This only works if you have a relatively solid background to remove.  If you have a sky that you would like to remove from your picture of a day on the beach, that may not be easy to remove.  The sky is not one solid color.  However, if you would like to remove the white part around the Dunkin’ Donuts logo, this procedure works very well.

PowerPoint is becoming a great tool for graphics manipulation.  Also, it is much easier to use than Photoshop.