Remove Background Graphics on PPT slide

I like to insert pictures in my presentations.   However, if you inserting pictures into a template that is already colorful, the pictures may be obscured by the template.

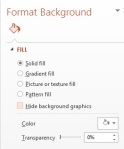
Fortunately, Microsoft developed a very simple solution to this issue.  In PowerPoint, right click on the slide in question and select Format Background from the menu.  In Format Background, select the option to Hide Background Graphics.  All of the background graphics will disappear for that slide only.

Format background

Word: No More Squiggly Lines

Have you ever wanted to get rid of those pesky squiggly lines in Word?  True, they can be useful sometimes in catching grammatical errors, but other times they can be downright annoying.

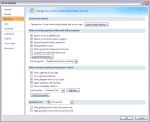
In other to turn the squiggly lines off in Word 2007, click on the Office button, which is the globe on the top left hand side of the screen with the Office logo on it.  Then click on Word Options.  On the left hand side, you will see a tab for Proofing.  Under Proofing, uncheck, Mark grammar errors as you type.

microsoft, microsoft word

Using “Is Null” to find empty records

Have you ever needed to find blank records in Access to replace with data?  You can’t simply leave the  field blank and expect Access to know what you are talking about.  For Access to find all values that are blank, under Find What:, type “Is Null.” This will indicate to Access that you are looking for all rows within a column that do not have any data.

find, replace, microsoft, access

Save as PDF

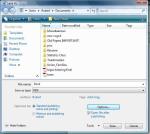
I notice online there are several websites that will convert a Word document into a PDF. However, this is something you can easily do using only Word 2010 or later. When you go File > Save As, under Save as type, choose PDF.

You can even restrict the amount of pages you wish to convert into a PDF. On the Save As dialog window, click on Options. This allows you to specify a page range. If you only need the page you currently are viewing, click Current page and you are all set.

The Convert to PDF option is available in all Office 2010 applications, as far as I know.

image

PowerPoint: Color Picker, Part II

Now that you have added Pick Up Object Style to your Quick Access toolbar, follow the below steps to use the tool.

  1. On the Insert toolbar, click on Shapes and draw a shape on the slide.  Add some text to it.
  2. Format the shape and text.
  3. Click the shape, and then press CTRL+SHIFT+C to pick up the style.
  4. Draw another shape and add text to it.
  5. Click this shape, and then press CTRL+SHIFT+V to transfer the style of the first shape to this shape.

That is all there is to it.

Purchasing MS Office for Cheap

If you were to buy MS Office in Staples or Target, it would be very expensive.  However, there are a few places where you can get MS Office for far less. 

Microsoft Home Use Program – Because I work for the state, I have access to this program.  On the site, you can enter your work email and Microsoft will let you know if you are eligible for this program.  If you are, you can get MS Office Professional Plus for $9.95.  This includes Access, Excel, PowerPoint, Word, InfoPath, Sharepoint, Outlook and OneNote.  You can download the software to your computer, or you can purchase the DVD at an extra cost.  Either way, it is a tremendous bargain. 

Your college or University – If you are a current college student, you can probably get MS Office for a reasonable price through your school.  Take advantage of the tuition you are paying! 

If you are not a student, and your workforce does not participate in the Microsoft Home Use program, you can buy the “Office Home and Student 2010,” which has Excel, OneNote, Word and PowerPoint for $119.  This is enough for the average computer user.
PowerPoint: Designing Buttons for the web

PowerPoint is becoming so powerful.  A lot of the functions that before you could only do in Photoshop, now you can do in PowerPoint.  You can make buttons in PowerPoint that will look great on your webpage.
  • On the main menu, click Insert > Shapes and find the rounded rectangle.  Place that in your slide.
  • Right click on the button and select “Edit Text.”  Add text to the button.
  • Choose a gradient.  Left click on the button and select the format tab.  Under “Shape Fill,” choose “Gradient” and choose the gradient you like.
  • When the button is ready for your webpage, right click on the button and select “Save as Picture.”  Make sure to save the graphic as a png.  This way, the rounded corners will be transparent.
Button made in PowerPoint

Button made in PowerPoint

This is an easy way to make an attractive button for your web page.  You do not need to learn Photoshop or Fireworks to make an attractive button for your web page.  Nowadays, you can use PowerPoint as your graphics editor.

PowerPoint – Compress Images

PowerPoint files are typically incredibly large.  I have one PowerPoint here that is 1.3 MB.  An excellent way to shrink a PowerPoint file is by clicking “Compress Images.”  Simply, click on one of the images in your presentation.  On the “Format” tab, under the “Adjust” pane, find “Compress Pictures.”  Click on the button.  The default compresses the images to 150 ppi.  The Compress Pictures function shrunk my PowerPoint from 1.3 MB to 822 KB.

Most importantly, the person who is viewing your presentation will not know the difference.  This simple task is something you should do before e-mailing out any of your presentations.

PowerPoint: Why are my images distorted?

Lock Aspect Ratio
Lock Aspect Ratio

Very often, you will see websites where images appear to be stretched out.  You wonder, how did that happen?  Truly, that person is not that thin, or that heavy?  It is embarassing when it is you that is stretched out in pictures.  Well, it doesn’t have to be you any longer!

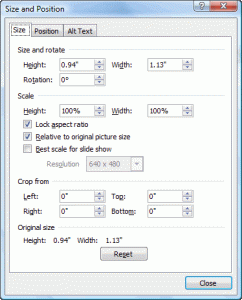
When resizing an image in your PowerPoint document, on the right hand side of the screen, you will see a “Format” tab.  Click on “Format”, and click on the dialog box launcher in the “Size” group.

In the “Size and Position” box, under “Scale” you will notice a button for “Lock Aspect Ratio.”  Keep that box checked.  It is only when you uncheck that box that you get distorted images.  Notice, as you adjust the height of the image, the width adjusts along with it.  This is what we are looking for. This ensures that the images do not become distorted.

This tip is fundamental to dealing with images.  It applies, not only to PowerPoint, but to any Microsoft Office or HTML document.

PowerPoint: Removing the background of an image

Remove the background of an image

Remove the background of an image

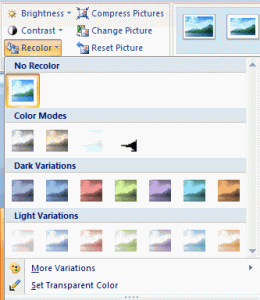
I found a great way to remove the background of an image in MS PowerPoint 2007.  First, add the image.  The “Format” tab will appear.  Click on the Format tab.  You will notice an option for “Recolor.”  Click the down arrow.  Select “Set Transparent Color.”  Then, click on the part of the image you wish to remove.  This action should remove the background.

NOTE:  This only works if you have a relatively solid background to remove.  If you have a sky that you would like to remove from your picture of a day on the beach, that may not be easy to remove.  The sky is not one solid color.  However, if you would like to remove the white part around the Dunkin’ Donuts logo, this procedure works very well.

PowerPoint is becoming a great tool for graphics manipulation.  Also, it is much easier to use than Photoshop.